Record audio using webrtc in chrome and speech recognition with websockets
There are many different web api standards that are turning the web browser into a complete application platform. With websockets we get nice asynchronous communication, various standards allow us access to sensors in laptops and mobile devices and we can even determine how full the battery is. One of the standards I’m really interested in is webrtc. With webrtc we can get real-time audio and video communication between browsers without needing plugins or additional tools. A couple of months ago I wrote about how you can use webrtc to access the webcam and use it for face recognition. At that time, none of the browser allowed you to access the microphone. A couple of months later though, and both the developer version of firefox and developer version of chrome, allow you to access the microphone!
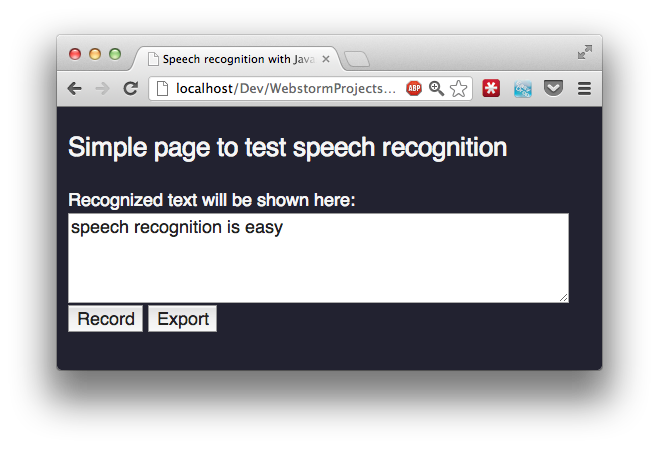
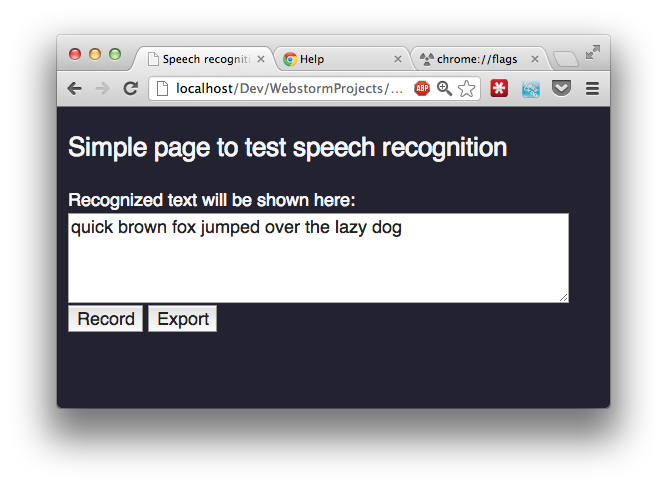
So let’s see what we can do with this. Most of the examples I’ve seen so far focus on processing the input directly, within the browser, using the Web Audio API. You get synthesizers, audio visualizations, spectrometers etc. What was missing, however, was a means of recording the audio data and storing it for further processing at the server side. In this article I’ll show you just that. I’m going to show you how you can create the following (you might need to enlarge it to read the response from the server):
In this screencast you can see the following:
- A simple HTML page that access your microphone
- The speech is recorded and using websockets is sent to a backend
- The backend combines the audio data
- And sends it to google's speech to text API
- The result from this API call is returned to the browser
And all this is done without any plugins in the browser! So what’s involved to accomplish all this.
Allowing access to your microphone
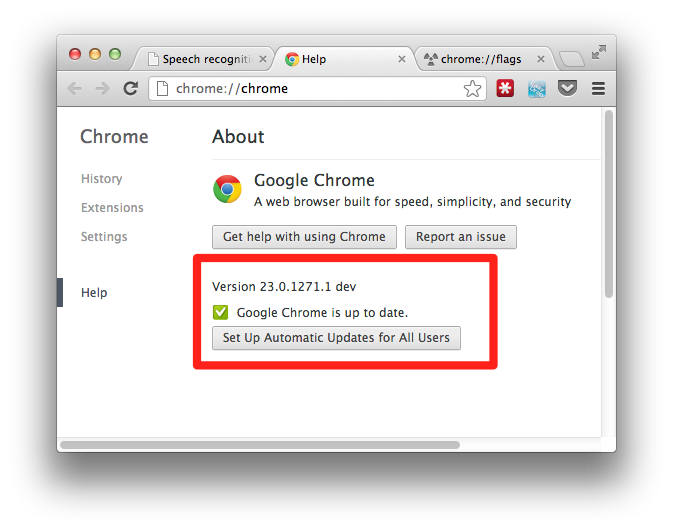
The first thing you need to do is make sure you’ve got an up to date version of chrome. I use the dev build, and am currently on this version:
Since this is still an experimental feature we need to enable this using the chrome flags.
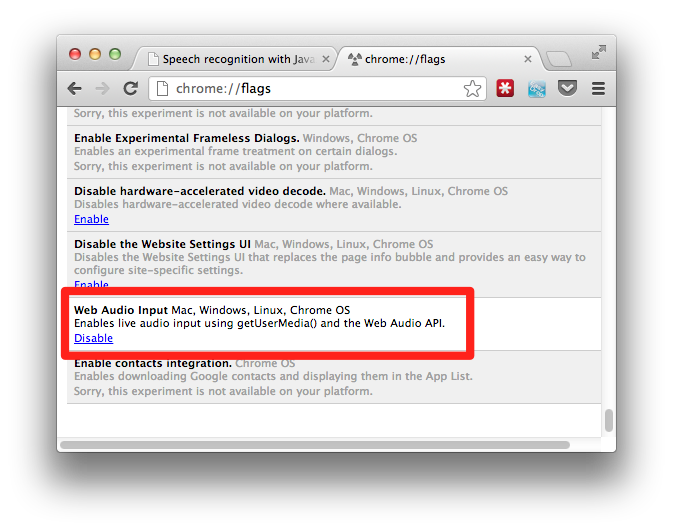
Make sure the “Web Audio Input” flag is enabled. With this configuration out of the way we can start to access our microphone.
Access the audio stream from the microphone
This is actually very easy:
          function callback(stream) {
               var context = new webkitAudioContext();
               var mediaStreamSource = context.createMediaStreamSource(stream);
               ...
           }

           $(document).ready(function() {
               navigator.webkitGetUserMedia({audio:true}, callback);
               ...
           }
As you can see I use the webkit prefix functions directly, you could, of course, also use a shim so it is browser independent. What happens in the code above is rather straightforward. We ask, using getUserMedia, for access to the microphone. If this is successful our callback gets called with the audio stream as its parameter. In this callback we use the Web Audio specification to create a mediaStreamSource from our microphone. With this mediaStreamSource we can do all the nice Web Audio tricks you can see here.
But we don’t want that, we want to record the stream and send it to a backend server for further processing. In future versions this will probably be possible directly from the webrtc API, at this time, however, this isn’t possible yet. Luckily, though, we can use a feature from the Web Audio API to get access to the raw data. With the JavaScriptAudioNode we can create a custom node, which we can use to access the raw data (which is PCM encoded). Before I started my own work on this I searched around a bit and came across the recoder.js project from here: https://github.com/mattdiamond/Recorderjs. Matt created a recorder that can record the output from Web Audio nodes, and that’s exactly what I needed.
All I needed to do now was connect the stream we just created to the recorder library:
           function callback(stream) {
               var context = new webkitAudioContext();
               var mediaStreamSource = context.createMediaStreamSource(stream);
               rec = new Recorder(mediaStreamSource);
           }
With this code, we create a recorder from our stream. This recorder provides the following functions:
- record: Start recording from the input
- stop: Stop recording
- clear: Clear the current recording
- exportWav: Export the data as a wav file
Connect the recorder to the buttons
I’ve created a simple webpage with an output for the text and two buttons to control the recording:
The ‘record’ button starts the recording, and once you hit the ‘Export’ button the recording stops, and is sent to the backend for processing.
Record button:
           $('#record').click(function() {
                   rec.record();
                   ws.send("start");
                   $("#message").text("Click export to stop recording and analyze the input");

                   // export a wav every second, so we can send it using websockets
                   intervalKey = setInterval(function() {
                       rec.exportWAV(function(blob) {
                           rec.clear();
                           ws.send(blob);
                       });
                   }, 1000);
               });
This function (using jQuery to connect it to the button) when clicked starts the recording. It also uses a websocket (ws), see further down on how to setup the websocket, to indicate to the backend server to expect a new recording (more on this later). Finally when the button is clicked an interval is created that passes the data to the backend, encoded as wav file, every second. We do this to avoid sending too large chunks of data to the backend and improve performance.
Export button:
               $('#export').click(function() {
                   // first send the stop command
                   rec.stop();
                   ws.send("stop");
                   clearInterval(intervalKey);
                   ws.send("analyze");
                   $("#message").text("");
               });
The export button, bad naming I think when I’m writing this, stops the recording, the interval and informs the backend server that it can send the received data to the google api for further processing.
Connecting the frontend to the backend
To connect the webapplication to the backend server we use websockets. In the previous code fragments you’ve already seen how they are used. We create them with the following:
               var ws = new WebSocket("ws://127.0.0.1:9999");
               ws.onopen = function () {
                   console.log("Openened connection to websocket");
               };

               ws.onmessage = function(e) {
                   var jsonResponse = jQuery.parseJSON(e.data );
                   console.log(jsonResponse);
                   if (jsonResponse.hypotheses.length > 0) {
                      var bestMatch = jsonResponse.hypotheses[0].utterance;
                       $("#outputText").text(bestMatch);
                   }
               }
We create a connection, and when we receive a message from the backend we just assume it contains the response to our speech analysis. And that’s it for the complete front end of the application. We use getUserMedia to access the microphone, use the Web Audio API to get access to the raw data and communicate with websockets with the backend server.
The backend server
Our backend server needs to do a couple of things. It first needs to combine the incoming chunks to a single audio file, next it needs to convert this to a format google APIs expect, which is flac. Finally we make a call to the google api and return the response.
I’ve used Jetty as the websocket server for this example. If you want to know the details about setting this up, look at the facedetection example. In this article I’ll only show the code to process the incoming messages.
First step, combine the incoming data
The data we receive is encoded as wav (thanks to the recorder.js library we don’t have to do this ourselves). In our backend we thus receive sound fragments with a length of one second. We can’t just concatenate these together, since wav files have a header that tells how long the fragment is (amongst other things), so we have to combine them, and rewrite the header. Lets first look at the code (ugly code, but works good enough for now :)
public void onMessage(byte[] data, int offset, int length) {

			if (currentCommand.equals("start")) {
				try {
					// The temporary file that contains our captured audio stream
					File f = new File("out.wav");

					// if the file already exists we append it.
					if (f.exists()) {
						LOG.info("Adding received block to existing file.");

						// two clips are used to concat the data
						 AudioInputStream clip1 = AudioSystem.getAudioInputStream(f);
						 AudioInputStream clip2 = AudioSystem.getAudioInputStream(new ByteArrayInputStream(data));

						 // use a sequenceinput to cat them together
						 AudioInputStream appendedFiles =
		                            new AudioInputStream(
		                                new SequenceInputStream(clip1, clip2),
		                                clip1.getFormat(),
		                                clip1.getFrameLength() + clip2.getFrameLength());

						 // write out the output to a temporary file
		                    AudioSystem.write(appendedFiles,
		                            AudioFileFormat.Type.WAVE,
		                            new File("out2.wav"));

		                    // rename the files and delete the old one
		                    File f1 = new File("out.wav");
		                    File f2 = new File("out2.wav");
		                    f1.delete();
		                    f2.renameTo(new File("out.wav"));
					} else {
						LOG.info("Starting new recording.");
						FileOutputStream fOut = new FileOutputStream("out.wav",true);
						fOut.write(data);
						fOut.close();
					}
				} catch (Exception e) {	...}
			}
		}
This method gets called for each chunk of audio we receive from the browser. What we do here is the following:
- First, we check whether we have a temp audio file, if not we create it
- If the file exists we use Java's AudioSystem to create an audio sequence
- This sequence is then written to another file
- The original is deleted and the new one is renamed.
- We repeat this for each chunk
So at this point we have a wav file that keeps on growing for each added chunk. Now before we convert this, lets look at the code we use to control the backend.
public void onMessage(String data) {
			if (data.startsWith("start")) {
				// before we start we cleanup anything left over
				cleanup();
				currentCommand = "start";
			} else if (data.startsWith("stop")) {
				currentCommand = "stop";
			} else if (data.startsWith("clear")) {
				// just remove the current recording
				cleanup();
			} else if (data.startsWith("analyze")) {
                        // convert to flac
	               ...
	                // send the request to the google speech to text service
	                ...
                       }
           }
The previous method responded to binary websockets messages. The one shown above responds to string messages. We use this to control, from the browser, what the backend should do. Let’s look at the analyze command, since that is the interesting one. When this command is issued from the frontend the backend needs to convert the wav file to flac and send it to the google service.
convert to flac
For the conversion to flac we need an external library since Java standard has no support for this. I used the javaflacencoder from here for this.
// get an encoder
FLAC_FileEncoder flacEncoder = new FLAC_FileEncoder();

// point to the input file
File inputFile = new File("out.wav");
File outputFile = new File("out2.flac");

// encode the file
LOG.info("Start encoding wav file to flac.");
flacEncoder.encode(inputFile, outputFile);
LOG.info("Finished encoding wav file to flac.");
Easy as that. Now we got a flac file that we can send to google for analysis.
Send to google for analysis
A couple of weeks ago I ran across an article that explained how someone analyzed chrome and found out about an undocumented google API you can use for speech to text. If you post a flac file to this url: https://www.google.com/speech-api/v1/recognize?xjerr=1&client=chromium&lang=en-US you receive a response like this:
{
    "status": 0,
    "id": "ae466ffa24a1213f5611f32a17d5a42b-1",
    "hypotheses": [
    {
        "utterance": "the quick brown fox",
        "confidence": 0.857393
    }]
}
To do this from java code, using HTTPClient, you do the following:
 // send the request to the google speech to text service
LOG.info("Sending file to google for speech2text");
HttpClient client = new DefaultHttpClient();
HttpPost p = new HttpPost(URL);
p.addHeader("Content-Type", "audio/x-flac; rate=44100");
 p.setEntity(new FileEntity(outputFile, "audio/x-flac; rate=44100"));

HttpResponse response = client.execute(p);
f (response.getStatusLine().getStatusCode() == 200) {
	LOG.info("Received valid response, sending back to browser.");
	String result = new String(IOUtils.toByteArray(response.getEntity().getContent()));
	this.connection.sendMessage(result);
}
And that are all the steps that are needed.