Browser to browser communication with Vert.x, websockets and HTML5
I’ve been playing around with Vert.x for a couple of weeks and I’m really starting to like the simplicity of the framework. With very little configuration you can quickly get impressive results. In this article I’m diving a bit deeper in how to set up browser to browser communication using the Vert.x eventbus by using the javascript client side API. In short I’m going to show you the following things:
- Use Vert.x as a simple web server
- Configure vert.x on the serverside to act as bridge for the browser eventbus implementation
- Create a simple example that shows how to use the eventbus from javascript
I’m going to skip the explanation on how to set up Vert.x. If you want more information on that look at this article where I explain the setup I’ve used in this example. So let’s get started with the first step.
Use Vert.x as a simple web server
This step isn’t really necessary, but I wanted to see how easy it was to host the example html and javascript files directly from vert.x. So instead of running them directly from the filesystem or from a local webserver, I created a very basic handler that serves simple files (with very little functionality). Doing this was surprisingly easy:
        // very simple routematcher, that matches a single path, simulates minimal webserver
        matcher.get("/web/:req", new Handler<HttpServerRequest>() {

            @Override
            public void handle(HttpServerRequest req) {
                MultiMap params = req.params();
                if (params.contains("req")) {
                    File f = new File("src/main/resources/web/" + params.get("req"));
                    try {
                        // get the data from the filesystem and output to response
                        String data = FileUtils.readFileToString(f);
                        req.response().setStatusCode(200);
                        req.response().putHeader("Content-Length",Integer.toString(data.length()));
                        req.response().write(data);
                        req.response().end();
                    } catch (IOException e) {
                        // assume file not found, so send 404
                        req.response().setStatusCode(404);
                        req.response().end();
                    }
                }
            }
        });
As you can see I added an additional matcher that matches everything inside the “/web” directory. When we receive a request we just get the file content as a string and return it. If something goes wrong, we just return a 404. Note that I’ve also could have just passed in the string to the req.response.end() method. With this small setup I just add the required HTML and JS files to the src/main/resources/web/ directory and I can access them through my browser. Easy? Yes. Very useful and functional? Hmm.. don’t know yet. The next step is to configure the server side part of the eventbus so the javascript client can talk to the Vert.x eventbus.
Configure vert.x on the serverside to act as bridge for the browser eventbus implementation
Before we can connect a javascript frontend to the Vert.x eventbus, we need one additional server side component. This component will act as a bridge between the javascript eventbus implementation and the serverside one. The javascript client uses Sock.js so you have to create the following:
        // set in and outbound permitted addresses
        JsonObject config = new JsonObject().putString("prefix", "/bridge");
        JsonArray inboundPermitted = new JsonArray();
        inboundPermitted.add(new JsonObject().putString("address", "msg.client"));

        JsonArray outboundPermitted = new JsonArray();
        outboundPermitted.add(new JsonObject().putString("address", "msg.server"));
        outboundPermitted.add(new JsonObject().putString("address", "msg.client"));

        vertx.createSockJSServer(server).bridge(config, inboundPermitted, outboundPermitted);
With the last line of this code fragment we create the bridge. This method takes three parameters. The first one defines the endpoint (url) the bridge will listen on. We need to remember this for when we write the client code. The next two parameters define on which eventbus addresses browser clients can send events, and the second one defines on which address the browser can receive events. So in this case:
- msg.server: only outbound messages are allowed. So in other words, browser clients can't send events to this bus address, but can listen to them. We will use this address to send events, periodically, from the server to the client.
- msg.client: both inbound and outbound message are allowed. So browser clients can receive and sent messages to this address. This address will be used for the browser clients to communicate with each other. Since all message travel through the central distributed event bus, we need to enable incoming and outgoing messages
Now all we need to do is connect the clients to the eventbus and create a simple HTML page we can use to communicate.
Create a simple example that shows how to use the eventbus from javascript
The first thing we need to do is include the correct javascript libraries.
<script src="sockjs-0.3.4.min.js"></script>
<script src="vertxbus-2.1.js"></script>
No, once the page is loaded, we set up the eventbus listeners.
    window.onload = init;

    function init() {

        // get the elements
        var inputArea = document.getElementById('in');
        var outputArea = document.getElementById('out');
        var serverArea = document.getElementById('outserver');
        var sendButton = document.getElementById('send');
        var broadcastButton = document.getElementById('broadcast');

        // get the eventbus
        var eb = new vertx.EventBus('http://localhost:8888/bridge');

        // when the eventbus is ready, register a listener
        eb.onopen = function() {

            // register to address
            eb.registerHandler('msg.client', function(message) {
               outputArea.value+=JSON.stringify(message)+'\n';
            });

            // and register for server events
            eb.registerHandler('msg.server', function(message) {
                serverArea.value+=JSON.stringify(message)+'\n';
            });
        }

        sendButton.onclick = function() {
            eb.send("msg.client",{send:inputArea.value});
            outputArea.scrollTop = outputArea.scrollHeight
        };

        broadcastButton.onclick = function() {
           eb.publish("msg.client",{publish:inputArea.value})
            outputArea.scrollTop = outputArea.scrollHeight
        }
    }
Not such complex code. What we do is we make a connection to the bridge by creating a new eventbus. We work with the bus in the same way as we do from the server side. I’ve created a simple UI so I can easily test whether stuff works:
<div id="input" class="main">
    <form>
<textarea id="in" rows="5" cols="80"></textarea>
     <div style="display:block">
         <input type="button" id="send" value="send" />
         <input type="button" id="broadcast" value="broadcast" />
     </div>

    </form>
</div>
<div id="output" class="main">
<textarea id="out" rows="5" cols="80" readonly></textarea>
</div>
<div id="fromserver" class="main">
    <textarea id="outserver" rows="5" cols="80" readonly></textarea>
</div>
Which looks like this:
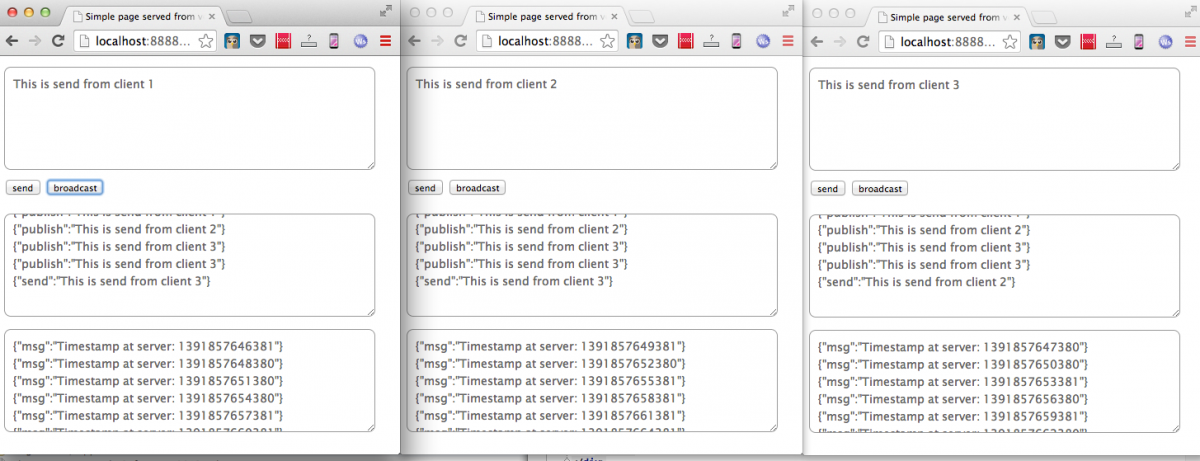
The bottom textarea displays events received from the server. We haven’t, however, set up the server to push messages at a regular interval. Luckily vert.x provides an easy to use mechanism for that.
        long timerID = vertx.setPeriodic(1000, new Handler<Long>() {
            public void handle(Long timerID) {
                vertx.eventBus().send("msg.server",new JsonObject().putString("msg", "Timestamp at server: " + System.currentTimeMillis()));
            }
        });
Easy right! The cool thing is that without much server side code you can easily create javascript applications that communicate with each other. The only thing you need to do is create the sockJS bridge and define the addresses that are allowed for inbound and outbound communication.